Making plantation shutters at home is a fun and affordable way to get a great quality window covering for your home without breaking the bank. Plantation shutters can be very expensive to buy online or locally at big box home improvement center. To avoid this cost and to have that feeling of personal satisfaction I decided to make my own. Watch the video above to more details.
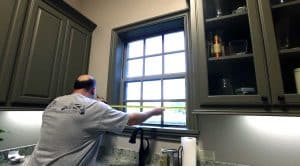 The material of choice for plantation shutters has always been Basswood. While you can make plantation shutters from other materials, basswood seems to have the right mix of weight and strength. It’s a relatively light hardwood, but its also easy to dent so care is needed while working with it. Step one is to measure for the shutters. I like to measure the window and then subtract 1/4″ from both dimensions. This will make sure there is plenty of room for the shutter to open and close, as well as leaving room for the hinges and magnets/latches mechanisms.
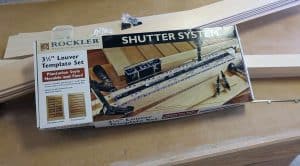 Making plantation shutters can be done without any special tools or jigs. However, that’s a huge pain and there’s a better way. Just like any other woodworking project you can make your own jig, but Rockler already makes one. I decided to go ahead any buy the Rockler Shutter System Jig, This system has all of the hole templates, self centering bits, and jigs that you need to get the job done quickly and easily. (Note: Rockler did not sponsor this or provide me with free stuff.) I also bought my basswood, hinges, hidden control arms, and router bits from Rockler. I also ordered my lovers pre-routed. Some of you will call that cheating, but routing the louvers is a giant pain in the ass. It’s something you should be doing with a shaper, not a router. Trust me. This is why you see so many homemade shutters with flat louvers!
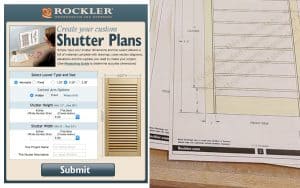 The next fantastic reason to use Rockler is their Shutter Wizard. The shutter wizard is free to use even if your don’t buy any merchandise from them! It automatically takes the dimensions you enter into it and coverts them over to shutter plans custom for your window(s). It also provides a detailed order list for materials, an exact cut list, and even recommended tools (such as the Shutter Systems Jig and router bits) that will help make your job easier.
Do yourself a favor and use this wizard! Especially if this is your first time. It removes all the guess work.
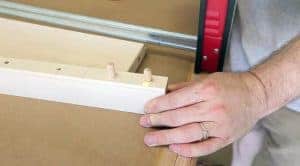 My joinery of choice for shutters is dowels. Lots of people will swear that a Mortise and Tenon joint is the only acceptable joint for a plantation shutter. Others will go for a Festool Domino or a biscuit joint. I feel like the dowels are right in the sweet spot. Best bang for the amount of time and labor I am willing to invest in this project. Feel free to disagree with me. It won’t hurt my feelings too bad. I would not use a biscuit joint though. That is destined to fail in short order. Especially if you’re making oversized or very wide shutters. I do recommend that you use plenty of glue and a water resistant glue is better, regardless of which joinery you choose for your plantation shutters.
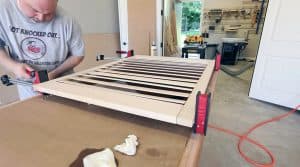 Once you get all of the shutter sections cut, sanded and ready; its time to do the glue up. You’re going to need some pretty long clamps for this unless you’re making a relatively small shutter. In my case, this shutter was 35″ wide by 45″ tall. Too wide for anything but my 48″ Bessey Clamps. Remember that Basswood is relatively soft for hardwood. Don’t over clamp it or you’ll wind up with a bunch of dents on the sides to deal with. Assembly is actually a pretty complicated process and the bigger the shutter the more so. You’ll need to slowly close the gaps as you insert each louver into the pin holes. But you have to go pretty fast before the glue sets up on you and ruins your day. You just spent hours to get to this point. There’s no turning back now!
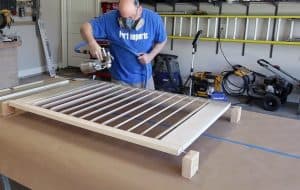 The next step is to paint the shutters! You can do this with a brush/roller, rattle cans (spray paint), and airless sprayer, or an HVLP sprayer. I decided the fastest way to get the results I wanted was to use my HVLP sprayer from Fuji Spray. I shot mine using an oil based paint, thinned about 20% with mineral spirits. This allows you to put on very thin, but wet coats of paint for a super smooth finish. As with any other project you do, I highly recommend you spray some test scraps of wood before shooting the actual shutter. Otherwise you’ll spend hours sanding it down and starting over. Now you don’t want to do that do you?
I like to screw 3″ drywall screws into the four corners of the shutter. This allows me to rest the screws on some blocks or saw horses. Once you’ve finished painting one side, you can easily flip it over using the screws and paint the other side. I recommend letting the shutter dry overnight before hanging it.
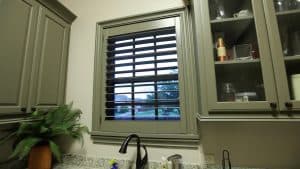 And that’s all there is to it. Just hang it in your window using hinges of your choice and enjoy them! You’ve just saved about 150% over the cost of buying them. And now you’ve got awesome bragging rights when your friends visit!
Products Used in this Video
Video Transcript
Hey Guys! It’s Mike, from The Geek Pub! In this episode we’re going to make Plantation Shutters. And we’re going to do it for about one third of what they cost at the local home improvement store.
The first step to making plantation shutters is to take measurements from the window, and then subtract 1/4 inch from each dimension. Follow that by heading over to Rockler.com and click on the plantation shutter tool! This tool will create a detailed PDF plan file and cut list. It also provides a detailed order list that you can use to order everything from Rockler if you’d like to do so.
Well, I went ahead and ordered from Rockler and few days later a brown box arrived on my front door with all of my goodies inside, saving me a drive to the lumber yard! I received two 1×6 basswood sections for the rails. Two 1×2 basswood sections for the stiles. A pack of stainless steel nails. Louver pins and hinges. A hidden control arm. Several pre-router sections of louvers. And finally the Rockler Shutter System Jigs. . But we’ll talk more about in a minute.
We’ll want to run all of the sections of wood through the planer and take off about 1/32 of an inch on both sides. Rockler says this isn’t necessary, but the wood I received did not have a smooth surface. But that’s OK, because it only takes just a second. You could sand it smooth if you don’t have a planer. Follow that by marking the boards based on the plan dimensions and cutting them to their final dimensions using a miter saw or crosscut sled.
I used my table saw to rip the stiles down to the proper dimensions, but they could also just go a few passes through the planer. Then rip the rails down to the final plan dimensions as well. The next step requires cutting some rabbets. I did this using a dado stack and a sacrificial fence on the table saw. You could use a router for this job. These rabbets will allow the top and bottom louvers on the shutter to tuck into the shutter fame when the shutter is in the closed position.
Once those steps are complete, lay everything out on a table and align all of the boards. I like to label each board at this point to make sure they don’t get mixed up.
My joinery of choice for shutters is dowels. So I lined up and marked all of the edges to be drilled. These lines mark where to drill the holes using my doweling jig. The doweling jig makes it super easy to drill the holes. Just line up these little markers with your pencil line and tighten to clamp it in place. It works on the sides of the boards, or the ends exactly the same.
Now is a great time to test fit everything before we go to the next steps. I like to dry fit the pieces to gather and place the shutter in the window, checking to make sure all the right clearances are in place. Correcting mistakes after this point will be much harder.
Now go ahead and do a quick sanding to smooth everything out and remove any marks from the previous steps. You’ll want to use a shutter cutter router bit to add the decorative edges on the stiles. You can pick this bit up from Rockler or any home improvement center. Follow that up by adding a 45 degree chamfer on all of the rails. This is really optional, but I like to add a round-over on the rabbets we cut earlier. This provides a nice clean look when the shutters are closed.
Now it’s time to drill all of the louver pin holes in the stiles. And that’s where the shutter jig makes all of the difference. Place the stiles face to face and then clamp the shutter jig in the middle of them. Then all that’s required is to drill the holes using the self centering drill bit provided in the kit.
When you run out of holes in the jig, you just slide it down and use these 1/4” pins to quickly re-align it. That’s it and your back to drilling! Using my crosscut sled and a stop block set to the right length I cut all of the louvers down to size. Using this method makes it easy to make repeated cuts of the exact same length. Once that’s done we need to move the stop block by 1/8” and then cut notches in the louvers to accept the hidden control arms.
The Shutter System comes with a jig for drilling the ends of the louvers. You’ll need a center hole on each side, and one side needs a control arm hole Each louver receives a shutter pin on each end. One lover receives a special tensioning pin that comes in the pin packs.
Now its time to start the glue up. This is a process that you can’t really stop once you start. So make sure you’ve got everything ready. It’s a somewhat complicated and rushed process. The more louvers the more time you need. I find it easier to only insert everything one end at time and slowly compress the joints as I go. This sped up about 8X to give you an idea.
At this point its critical to make sure everything is square and lined up. I will be impossible to fix after the glue dries. I like to tighten the clamps, loosen them, and the re tighten them again. Once you’re done it should look like this. You’ll want to let them sit over night in the clamps before moving on.
The next step is paint. I used my HVLP sprayer and our trim color to paint the shutter. But you can certainly paint them with a brush if you don’t have a sprayer. Once the paint dries its time to install the hinges. I installed them 3 inches from each end. Basswood is a stringy wood so be sure to drill slow and not to over tighten your screws.
Take the hidden control arm and cut it to the proper length. In my case 12 louvers. Then use the stainless steel nails provided to attach it to each lover. The hidden control arm makes for a really clean look and allows the movement of one louver to move all of the louvers.
All that’s left to do is screw the shutter into the window frame. I used magnetic clips to keep my shutters closed. I feel like this provides a very clean look and simple operation, but you can also use pins or latches if you prefer. The magnet just attaches to the top and bottom of the window frame.
And that’s it! You’ve just built and installed your very own Plantation Shutters and minus my time, it cost me approximately one third what our local home improvement store quoted. Saving money and gaining bragging rights! Now that’s what I call a win-win.
The post How to make Plantation Shutters appeared first on The Geek Pub.